Saturday, January 29, 2011

The Blog Days of Winter

Grandma "hiding" behind Scout

Hello Foodie Fans!

Nope, I haven't disappeared off the planet, but this girl is taking some blogging days off to get some much-needed projects done around the house. 

Super bowl is coming up too and we're having a party, so I'll be getting out Grandma's cookbooks to figure out the menu. Be sure to stop in and see what we come up with!

Blessings to you all!

Friday, January 28, 2011

Hasselback Potatoes

We have really traveled the world with our cuisine this week. Today we've migrated from Ireland all the way to Finland. Seems like a real stretch, but this potato recipe gem is worth it. 

There's some controversy surrounding the name of these potatoes. Hasselblad or Hasselback. I'm going with Hasselback because that's what Grandma's recipe book says. Either way, they're an easy peazy keeper. Try the technique given for slicing the potato. It really does work!

The only thing I might do differently is the cheese on top. There just wasn't enough. I didn't recall Grandma having used Parmesan cheese (unless she really piled it on there--which may very well have been the case). Next time I might pile on some cheddar or Swiss. Either one would be a great substitute but the heat would have to be reduced I'm sure. We'll have to play with this one a little.

Here's the charming recipe directly from one of Grandma's quaint guild cookbooks. It was a well-loved and well-used book!


Thursday, January 27, 2011

Irish Part 3--Guinness Pork Chops

Okay, I admit I'm on a bit of a Guinness kick lately. Maybe it's a sudden desire to be Irish, I don't know, but I'm thoroughly enjoying preparing and serving these main courses that fill the house with a comforting aroma (and the fam is loving it too--more the eating than the smelling though!).

This pork chop dish is almost as good as the Guinness Irish Stew and, again, it's just gotta be the Guinness. I don't care for it by itself--a little too heavy for me--but in gravies and soups I'm convinced it's the secret weapon. It may also have some tenderizing ability too, because the meats that could come out very fibrous or tough with all the simmering, end up fork tender. And the gravy! Don't get me started or I'll launch into something like I have in some of my recent posts. (I think I'm a little too passionate about delicious food!) 

Another secret I'll share with you is God's gift to the cook--immersion blenders. They are ideal for making smooth gravies, sauces, and soups right on the stovetop. No need to pour it all into a blender or food processor. This tool is a relatively new phenomenon and my adding it into the recipe below is my own doing. It wasn't in the original. Grandma used a whisk to make her divine gravies. I would probably get tennis elbow if I stood there whisking fast for 10 minutes. No thank you and I'm sure Grandma would forgive me. In fact, she would probably switch to an immersion blender as well!

Give these a try and let me know what you think!


Guinness Pork Chops

8 boneless pork chops (1 inch thick)
salt and freshly ground pepper
all-purpose flour
 
1 tablespoon unsalted butter
1 tablespoon olive oil, divided
2 onions, chopped
3 garlic cloves, minced
1 cup Guinness
1 cup chicken and/or beef stock
1 tablespoon chopped fresh parsley
1 teaspoon balsamic vinegar

Wash pork chops and season with salt and pepper. Dredge in the flour, shaking off excess.  Set aside.

Melt butter and olive oil in Dutch oven or large heavy skillet over medium high heat. Sear chops in batches about 5 minutes on each side (being careful not to burn), remove from pan until all 8 chops are seared.

Put onions in separate bowl and sprinkle 1-2 tablespoons all-purpose flour on top. Mix with spoon until onions are coated with flour and season with salt and pepper. Heat reserved tablespoon of olive oil in the pan and pour in the seasoned and floured onions. Add garlic. Cover and simmer about 5 minutes.

Pour in 1/4 cup of the Guinness and 3/4 cup stock and bring to boil scraping up brown bits on bottom of pan. Return chops to the pan and spoon some of the onions on top. Add remaining Guinness and stock to almost cover chops. Cover pan, reduce heat to simmer about 20 minutes, then flip over chops and continue simmering about 20 more minutes.  

Remove chops from pan and heat remaining juices to boiling. When thickening begins, add parsley and balsamic vinegar, and blend with immersion blender until smooth.  Serve with gravy on top.

Wednesday, January 26, 2011

Irish Part 2--Guinness Irish Stew

Here's part 2 of our "Irish series." (Why wait for St. Patrick's Day?) 

No need for perfumy sprays to make your house smell good...this'll do it. Only difference is that your house will smell like a home. Grandma's always did and generally it was so good you just had to ask what it was in the oven creating the wonderful smell! Usually it was something unique and different like this little bit of heaven in a dish.

I'm convinced that the secret ingredient is the dark, heavy and pungent Guinness Draught. It's pricey but I'm not sure anything else would work--I know Bud or Miller would not. Dear husband suggested Killian's Red or O'Douls, but I'm not sure I'd want to risk a substitution! You can tell I'm no beer expert by any means and, in this case, not very adventurous but I would honestly recommend staying true to this stew's ingredients list. You will not regret it!


Guinness Irish Stew

2 tbsp olive oil
3 bay leaves
2 lbs beef stew meat, cut into 1-inch chunks
1 large onion, coarsely chopped
2 cloves garlic, coarsely chopped
1 teaspoon dried thyme
1 teaspoon dried rosemary
2-3 tablespoons all-purpose flour
¾ cup beef broth
½ cup Guinness Draught
1 tablespoon dried chopped parsley
½ pound carrots, sliced (no need to peel)
salt and freshly ground black pepper to taste

Heat a Dutch oven over medium high heat and add olive oil and bay leaves. Cook the bay leaves for a moment and then increase heat to high, add the stew meat and brown on both sides. Add the sliced onion and cook for a few minutes until transparent. 

Reduce the heat to low and add the garlic, thyme, rosemary and flour. Stir well until smooth. Add beef stock and Guinness. Simmer, stirring until stew thickens slightly. 

Add remaining ingredients, cover, and place in a 275F oven for about 2 hours. Check periodically and add a little liquid if necessary. Salt and pepper to taste before serving (may not need salt). Serves 4-6.

Try the Irish Soda Bread to go along with this.

Tuesday, January 25, 2011

Irish Part 1--Soda Bread

To those of you new to Grandma Cooks 365, here's a primer: I was raised by Grandma and Grandpa. They literally sacrificed their retirement to give me a good upbringing. They never said a word about it, which made it that much more amazing and now that I look back as a parent--all the struggles, stress, and hard work (but joy mixed in there too!)--I realize what they had done for me. I won't belabor the point, other than to say I was truly blessed!

With that little preface, let me say that there were days I'd come home from school and the entire house was filled with a fragrance so wonderful, I thought I was in a 5-star restaurant. Now I didn't know what a 5-star restaurant was at that time, but the smell was so heavenly that that's what I imagined a 5-star restaurant would smell like (even to this day, since I don't frequent them! LOL). 

There is a restaurant here in town--an Irish pub (and not a 5-star either!)--that my husband and I love to visit and whenever we go in there the smells are familiar and wonderful. That smell throughout our house back when I was growing up was Irish Stew and Irish Soda Bread! I found Grandma's recipe and I'm happy to share it with you!  We'll start out with the bread today. Tomorrow we'll give you the stew! 

You've got to try both of these (hopefully together) so that you can smell exactly what I'm pontificating about today! The aromatics are unsurpassed, but isn't that what cooking is all about? Start with the smells. Pull it all together (remember--no fear!) and you will be elevated to "awesome cook" status before your dear children venture out to live their lives. Hopefully, somewhere along the line you've made an impact on them. They will remember the smells, the tastes, the joy around the kitchen table.  

So here is: Irish Part 1--Soda Bread. This is so easy and other than getting the sticky dough off your fingers, it's effortless! Now you don't have to make the Irish Stew along with this-- you can try it on its own and you'll be convinced this is a keeper for any hearty meal! Enjoy!


Irish Soda Bread

4 cups all-purpose flour
1 teaspoon baking soda
1 teaspoon salt
14 ounces buttermilk

Preheat oven to 425F and grease and flour a cake pan.  

In large bowl combine all dry ingredients and sift through a sieve. Add buttermilk and form a sticky dough. Place on floured surface and lightly knead a couple of turns but not too much or the dough will be tough. Shape into round flat shape, put in greased cake pan, and use a sharp knife to cut a cross on the top of the round of dough.  Cover the pan with another cake pan (like a lid) and bake for 30 minutes.  

Remove the cover and bake for additional 15 minutes. When done, the bottom of the bread will have a hollow sound when tapped. Cover the bread in a damp dish towel to keep the loaf moist. Slice thickly, butter, and serve with Irish Stew.

Monday, January 24, 2011

Sour Cream Pound Cake

Who doesn't love something sweet occasionally? Grandma absolutely loved pastries and "treat" breads, especially the citrus-containing variety--orange, lemon...it didn't matter. She thought (and I agree) they were refreshing! This one has all that and more. 

Although the recipe is called "Sour Cream Pound Cake," it's actually not a pound cake in that it's not dense or heavy. All the eggs and the sour cream make it very light and airy.  Matter of fact, the batter is like a cloud by the time you pour it into the baking pan! It's more like a lemon bread and so very good. By itself or topped with a dollop of whipped cream or even fresh fruit...yum!

The original recipe called for baking in a "tube," but I used two baking pans (the size of a bread or meatloaf pan). I don't recall that Grandma used a tube either. How ever you bake it, the results are old-fashioned and great! Just like Grandma was!


Sour Cream Pound Cake

3 cups all-purpose flour
1/4 teaspoon baking soda
1/8 teaspoon salt
2 sticks butter (room temperature)
3 cups granulated sugar (yes, 3 cups)
6 eggs (room temperature), separated.
1 teaspoon vanilla
1 teaspoon lemon extract
1 cup sour cream

Sift flour, soda, and salt together.  Cream butter and sugar (it will not be totally smooth). Add egg yolks one at a time, beating until creamy. Add flavorings and dry ingredients alternately with sour cream. Beat egg whites in separate bowl, fold in mixture. Place in greased tube pan (or 2 greased baking pans). Bake at 300F for 1 hour 30 minutes. Glaze while hot with lemon glaze.

Lemon Glaze

3/4 cup powdered sugar
Juice of one lemon

Blend well and brush over hot cake.

Sunday, January 23, 2011

Grandma's Pancakes

Grandma's pancakes were quite simply the best I've ever tasted. No mixes here. Besides what real convenience are mixes? You still have to break an egg and add milk!  This recipe just has wholesome ingredients and the simple combination is as easy as the instant. 

Matter of fact, you could possibly blend the dry ingredients and create your own mix.  Put them all in a large zip lock bag and either write the additional ingredients and directions right on the bag with a Sharpie or print out the recipe and tape it on.

The only trick I recommend is to make sure your ingredients are as fresh as possible. Grandma went through her dry goods so quickly that she was always stocking up, but she used to say that the results of any recipe are only as good as the ingredients you use.  Make sure they are fresh. This is especially true with pastries, breads, and any other bakery-type items. How long has that baking powder or soda been sitting on your pantry shelf? If you can't remember, it's time for a new one. I must admit I used "past-its-prime" baking powder once in these and the results were no where near as good as after I cracked open a new can. The pancakes puffed up and became a culinary work of art!

Serve these on any given morning with powdered sugar and butter on top and you'll be sending your loved ones out the door happy!  PS - Use your prettiest dishes! That'll wake 'em up! ;D


Grandma's Pancakes

1 cup all-purpose flour
2 tsp baking powder
1/2 teaspoon salt
2 tablespoons sugar
1 large egg, lightly beaten
1 cup milk
1 teaspoon vanilla extract
2 tablespoons butter, melted

Heat up non-stick griddle or pan to medium high or 375F (also preheat oven to 175F to keep cooked pancakes warm).

Whisk together first 4 ingredients. Add egg, milk, vanilla extract, and butter being careful not to over mix. (Batter should still have small lumps.)

Pour enough batter onto griddle so pancake pools to about 4 inches in diameter (about 1/4 cup). Let cook on one side until top is bubbly (about 2-3 minutes), then gently flip over. Cook an additional minute then remove from heat and place in an oven proof dish in warm oven.

Saturday, January 22, 2011

Tuna Casserole

On those rare occasions when Grandma would buy a bag of potato chips, we knew there was a good chance that (1) either she was having a guild meeting and would whip up a delicious crab dip to pair with the chips or (2) she was going to make one of her delicious tuna casseroles.

Her tuna casseroles were unsurpassed for crunchy golden deliciousness and, yes, it has the potato chips mixed in and crumbled on top. This is not only simple to make, but also a good budget meal. However, let me tell you right now there probably won't be any left for lunches or leftovers. It's that good! So savor this one for the record books. You and your family will love it!


Tuna Casserole

5 cups uncooked egg noodles (or No-Yolk Noodles)
1 can cream of mushroom soup (or Grandma's homemade version)
    PLUS 1 soup can of half & half
1 tsp Worcestershire sauce
2 regular cans of tuna packed in water, drained
3 cups regular potato chips, coarsely crushed (reserve 1 cup for topping)
1 cup frozen petite peas

Freshly ground black pepper


Preheat oven to 350F and grease a casserole dish with butter. Cook the egg noodles according to the directions on the bag.

In separate bowl, combine soup with a can of milk. Stir in cooked/drained noodles, Worcestershire sauce, drained tuna, 2 cups of the crumbled chips, and peas. Pour into greased casserole dish and top with ground pepper and reserved cup of potato chips.  Bake at 350F for 35-40 minutes.

Friday, January 21, 2011

Ravioli Soup

It is so beautiful when a week comes together--good meals, good memories, and when all the leftovers are used up.  Our fridge was literally jammed with stuff that we really needed to get rid of, but I am loathe to pour anything down the drain or throw it out. I just hate wasting anything!

With that in mind, I found a recipe in Grandma's archives that literally could be considered "toss-it all-in-soup."  She would have been proud.

  • Lean ground beef (how about using up that ground turkey?)
  • Onions & garlic (what about all the extra onions and garlic we prepped yesterday?)
  • Beef broth (what about the leftover French Onion soup we had the other night? It is mostly beef broth.)
  • Ravioli (what about that big bag of them in the freezer we've been meaning to use up?)
  • Bread (what about that French loaf that will be brick hard by tomorrow?)

Yes, my friends, I threw it ALL in there...and it was quite simply amazing! Only problem? I may have to make it exactly the same, French onion soup and all!


Ravioli Soup

1/2 lb lean ground beef (I used ground turkey)
1/2 lb ground pork
1 cup onion, chopped
2 tsp garlic, minced
1 28 oz can Italian tomatoes, undrained
1 12 oz can tomato paste
2 (14.5 oz) cans beef broth (3 cups of French Onion soup here, onions and all)
1 Tbsp sugar
1 tsp Italian seasoning
¼ cup dry bread crumbs (I processed a couple slices of a French baguette)
½ cup Parmesan cheese (fresh), shredded
1 (12 oz) pkg frozen ravioli (14 raviolis)

Brown beef and pork with onion and garlic in non-reactive pan or a Dutch Oven. Combine tomatoes, tomato paste, beef broth, sugar, Italian seasoning and dry bread crumbs. Bring to a boil. Reduce heat and simmer 30 minutes. Stir in Parmesan cheese. Meanwhile, cook ravioli according to package directions and drain.  Top bowls of soup with ravioli and additional Parmesan cheese and serve with salad and bread.

Thursday, January 20, 2011

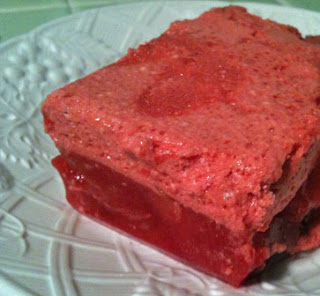
Juicy Fruit Jello Salad

In the middle of cold winter it's so nice to have a summer breeze blow through in the form of a fruity and light jello salad. Sometimes you just gotta fix it.

Grandma would frequently have some form of jello in the fridge. Nothing fancy, maybe just orange jello with some fruit or mandarin oranges in it. To the evening fridge surfers out there, it's a little better than a fatty snack. Jello used to be considered a diet food, but with the glucose levels in America running amok, it's probably not anymore. There are sugar-free varieties of Jello, but I think I would rather use the full-fledge sugar version than the Splenda-riddled stuff. It's the same argument as the choice of butter over margarine. Somehow it seems like the healthier option. 

I must admit I don't make jello salads enough, but with the kudos received after making this one, I'll definitely have to make them more often.


Juicy Fruit Jello Salad

1 ½ cups boiling water
1 packet (8 serving size) Jello Strawberry or Cranberry gelatin
1 cup cold orange juice
ice cubes
1 (8 oz) tub Cool Whip topping, thawed and divided
1 can fruit cocktail, drained

Stir boiling water into gelatin in large glass bowl at least 2 minutes until completely dissolved. In separate bowl or measuring cup, mix cold orange juice and ice cubes to make 1¼ cups. Add to gelatin, stirring until slightly thickened (consistency of unbeaten egg whites). Remove any remaining ice and refrigerate 45 minutes.

Reserve 1 cup of gelatin. Stir ½ of the whipped topping into remaining gelatin until smooth. Pour mixture into 8-inch square pan or 1½ quart casserole dish. Refrigerate about 5 minutes until set but not firm (should stick to finger when touched). 

Stir fruit into reserved gelatin and carefully spoon over creamy layer in pan. Refrigerate 3 hours or until firm. Cut into squares and serve with garnish, if desired. Servings: 9.

Wednesday, January 19, 2011

Apple-Baked Pork Chops

A popular term right now is "comfort food." 

I imagine they call it that because some foods may bring back memories of a comforting time at home with no worries or cares. Some of the old standby recipes like meatloaf, pot roast, and chicken soup are all comfort foods for me. 

We had dinner at the table every night--just us three--Grandma, Grandpa, and me. How on earth Grandma found the energy in her 60s and 70s to cook a full meal deal, I have no idea. And, of course, I didn't appreciate it then. Shame on me. I was a reckless brat. 

Okay. True confessions aside, I have at least come full circle to give Grandma her due and I'm sure an angel in heaven has given her the good word that the brat finally came around. I have realized for quite some time how important a meal at the table with the family is. How important the wonderful kitchen smells are and how meaningful the care in preparing a meal is to a kid--even if they don't appreciate it at the time.

This one is a comforting standby and one that will fill your kitchen with beautiful smells and comforting memories. Apples. Onions. Cornbread stuffing. C'est une belle vie.

Enjoy this one with your whole heart. You are making memories by preparing it.

Apple-Baked Pork Chops

6-8 boneless pork loin chops, 1/2 inch thick*
1 tsp dried thyme, divided
Salt and pepper
4 tablespoons butter, divided
1 cup onion, chopped
1 cup apple, peeled and chopped
1 1/2 cups cornbread stuffing mix, processed to crumbs
1/2 cup water

Preheat oven to 425F.  Melt 2 tablespoons butter in large skillet over medium-high heat. While butter melts, trim pork chops and sprinkle both sides with 1/2 teaspoon thyme, salt and pepper. Add chops to skit and cook 3-4 minutes each side until no longer pink. Transfer to baking pan.

Melt remaining 2 tablespoons butter in same skillet and add onions and apples. Scrape pan greases while cooking and cook onions and apples for about 5 minutes until softened. Add stuffing mix crumbs, water and other 1/2 teaspoon thyme. Cook 2-3 minutes, stirring, until water is absorbed and stuffing is moist.

Mound 1/4 cup of stuffing mixture on each pork chop in baking dish.

Bake in 425F oven 8-10 minutes until stuffing is crisp and lightly browned. 6-8 servings.

*We purchased 1 inch thick pork chops from Costco and balked a little at the price, but we cut them in half and ended up with twice as much for the money!


Tuesday, January 18, 2011

Ham & Vegetable Stuffed Crêpes

Crêpes are one of the most versatile things in the culinary world. You can make them for breakfast, lunch, dinner, dessert, or appetizers--it all depends on what you fill them with. 

Of  course, Grandma knew all that and when the budget was a little tight, she would abandon any thoughts of a big heavy meal and go for light crêpe fare filled with something delicious.

She had a funny-looking flat-topped, non-stick crêpe pan with no lip and it took her some amount of practice to perfect its use. If she poured too much batter on top, it would run off the sides onto her electric burner and into the pan beneath. (Even with the aluminum covers most of us remember what a dried on mess that could be.)  Eventually she gave up on the crepe pan (remember garage sale fodder?) and just cooked them in a non-stick skillet, which worked just as well. 

Another plus with crêpes--other than the fact that they contain about 4 ingredients and can practically be cooked while unconscious--is that they can be made in advance and stored in the fridge or freezer until you're ready to use them, which prevents pans, skillets and mixing bowls from causing a counter top crisis. Just bring the refrigerated batch to room temperature and then fill them with your items of choice.

We may be having crêpes most of this week simply because my meal planning and prep has been put to the test with our kitchen project. I am thanking God above for giving me the good sense not to do a full blown, down-to-the-studs kitchen renovation, because even having our cupboard contents temporarily boxed up in the living room is challenging enough!

With those constraints in mind, today's crêpes will be simply filled with ham and vegetables and topped with a yummy cheese sauce. Is there anything more divine than that?

Here's the basic recipe and the first step to crêpe heaven.  (Keep in mind it takes longer to explain how to do it, than to actually do it. Bottom line? If you can cook pancakes, you can cook these.)

Basic Crêpes

½ cup milk
½ cup cream
3 eggs
2/3 cup all-purpose flour
2 Tbsp butter

With wire whip (or in food processor), blend milk, eggs, and flour until smooth. 

Place a 6 or 7 inch crêpe pan (or other flat-bottomed frying pan) over medium heat. When pan is hot, add ¼ teaspoon of the butter and swirl to coat surface. All at once, pour in 1 ½ to 2 tablespoons batter, quickly tilting pan so batter flows over entire surface. Cook until surface appears dry and edge is lightly browned; turn over with spatula and briefly cook other side. Transfer to plate and repeat procedure for each crêpe, stacking them when finished. After all the crêpes are cooked, you can wrap airtight and refrigerate up to a week. Makes 12-16 crêpes.

NOTES: 
Unfilled crêpes may be frozen stacked one on top fo the other between pieces of wax paper and wrapped airtight. To serve, remove the number of crêpes you need and let them come to room temperature before filling (they tear when cold). Avoid refreezing.

Filled crêpes may be frozen individually then baked (without thawing) in whatever quantity is needed. To freeze, place filled crêpes, seam side down and not touching, on greased baking sheet. Freeze uncovered, then package airtight.


Ham & Vegetable Stuffed Crêpes

12-16 pre-made basic crêpes
5 tablespoons butter, divided
1 small onion, finely chopped
3 tablespoons all-purpose flour
2/3 cup chicken broth
1/2 cup half & half or milk
2 cups cooked ham, cut in julienne strips
1 (10 oz) package frozen peas, thawed and drained well
1/3 cup Parmesan cheese, grated
1/4 tsp dry rosemary (optional)
salt and pepper
1 cup Swiss cheese, shredded

Prepare crêpes or bring to room temperature, if refrigerated. In a wide frying pan over medium heat, melt 2 tablespoons of the butter. Add onion and cook until onion is soft. Add remaining 3 tablespoons butter and flour; cook, stirring until bubbly. Gradually pour in broth and half and half and continue cooking and stirring until sauce boils and thickens. Add ham and peas. Remove from heat and stir in Parmesan cheese, rosemary (if using), and salt and pepper to taste; cool slightly.

Spoon filling down center of each crêpe and roll to enclose. Arrange crêpes, seam side down in shallow greased casserole or baking dish. (At this point you may cool, cover and refrigerate until next day or freeze as noted in Basic Crêpe recipe.)

Baked covered in 375F oven for 20 minutes (30 minutes if refrigerated; 35-40 minutes if frozen) or until heated through. Remove from oven, uncover and sprinkle Swiss cheese over crêpes. Return to oven and bake uncovered for 5 more minutes or until cheese melts.

Servings: 6-8.


Monday, January 17, 2011

French Onion Soup

Grandma loved onions. In fact, she would order Vidalia Onions from some mail-order place in Georgia every year. We could tell too. After getting them it seemed all of her recipes calling for onions were magically transformed into something downright miraculous simply because of this change-up. 

There's just something about a Vidalia onion that is unsurpassed. Meaning no disrespect to our nearby Northwest farms, but Walla Walla Sweets just don't compare with Vidalias. It may very well be worth expanding my carbon footprint to have them shipped from across the country. 

So with every order of Vidalia onions welcomed from down South, Grandma would always make up a big batch of French Onion Soup and it was the absolute best. It wasn't the squishy melted cheese or hunk of brioche on top, but the salty-sweet liquid underneath overflowing with Vidalia onions. 

If you are heaven-blessed enough to have Vidalias readily available in your local market, grab a bunch, send some to me, and then make this French Onion Soup. You will thank me (and Grandma too).


French Onion Soup

3 tablespoons butter
6 large Vidalia onions, thinly sliced
1 tsp sea salt
1 cup white wine
2 quarts beef broth
Sea salt and freshly ground pepper to taste
6-8 slices Brioche or your favorite French style bread
1½ cups grated Gruyere or Swiss cheese (or blend either one half & half with grated Parmesan cheese)
¼ cup Madeira or sherry

Over medium heat, melt butter in Dutch Oven and add onions. Toss onions with sea salt and gently stir until onions wilt in the pot, then reduce heat to low. Cook onions about 30 minutes, stirring periodically (do not allow them to burn). 

When they turn a rich golden brown color, add white wine and bring to a boil allowing liquid to reduce until almost evaporated. Increase heat to medium and add broth. Bring to a bubbling simmer then reduce heat to low, cover, and simmer for 45-50 minutes.

Preheat oven to 350F. Cut loaf of bread into 1 inch slices or chunks, butter each piece if desired, then place in single layer on a baking sheet and toast in oven until golden brown.

After soup has simmered for 45-50 minutes, taste broth and add sea salt (if additional is necessary) and pepper to taste . Add Madeira, stir into broth, then ladle into oven-proof soup bowls set on a rimmed cookie sheet. Top with slice of toasted bread and divide cheese among the bowls. Bake until bubbling and cheese is slightly browned (about 20 minutes). Servings: 6-8. 

Serve with tossed lettuce or spinach salad. Also asparagus wrapped in a crepe would be an impressive side dish!

NOTE: If you don't use up all the broth, save the extra for french dip sandwiches.

Sunday, January 16, 2011

Homemade Pizza

As some of you know, we've been working like crazy trying to finish the "reno" on our kitchen and right now cooking is next to impossible. Some of the cabinet doors are removed or set half-open because of wet paint. I'm finding paint splats on the floor, on my stove, on the countertops...it's driving me nuts!  So we have an extra day this weekend to really kick it into high gear and get the main work area done. After that we're on to the pantry around the corner and, other than the fact that I probably won't be able to find anything once everything is boxed up, I'm welcoming some improved organization there in the near future.

While we're in this phase, we've been missing our family dinners at the table and eating has been totally on the fly. (I'm sure we'll all need to detox by the time we're done.) For what it's worth though, I whipped up a homemade pizza yesterday, thanks in whole to R2D2--my beloved bread machine! He did all but stretch out the dough and put on the toppings. I figure a homemade one is a little better than frozen boxed.

If you are fortunate enough to have a bread machine, get it out and use it. The bread is healthier and nothing at all like the tasteless store bought stuff. Even pizza dough is quick and amazing tasting with a little Italian seasoning or Parmesan cheese added in when the machine beeps midway through the cycle. 

As I've said frequently, Grandma didn't consider herself a baker (and Lord knows, she wouldn't have cooked pizza!) but she sure enjoyed the loaves of fresh bread I brought her from the first R2D2 I got almost almost 20 years ago. She loved the big hunks toasted with a little honey or jam on them. 

I think if she'd had a bread machine many years earlier, she would have dove in feet first and tried all the recipes it had to offer. When you get to your 80s or 90s though, it takes a little more effort to be adventurous. I guess that's why we grandchildren have to step up and be adventurous on behalf of our older loved ones!


Homemade Pizza

1½ cups warm water
1½ tablespoons vegetable oil
3¾ cups bread flour
1 tablespoon plus 1 teaspoon sugar
1½ teaspoons salt
1½ tsp active dry yeast

Add ingredients to your bread machine in the order recommended by the manufacturer. Choose the dough cycle.

When dough cycle is complete, preheat oven containing pizza stone to 400F.

Remove dough from bread machine pan and place on floured board or work surface. Split into two pieces and knead each to form a ball. Work each piece quickly, stretching out to desired size, allowing to rest for a few minutes if dough becomes resistant to stretching. Once desired size is achieved, pierce all over crusts with a fork to prevent bubbles when cooking. Place crusts on pizza peel and place in oven on preheated stone. Cook for 10-15 minutes.

Remove using pizza peel and top with desired toppings. Return to oven and cook until cheese is melted. Makes 2-3 12-inch pizzas, depending on crust thickness.

Saturday, January 15, 2011

Breakfast Cups

"What's for breakfast?"

Like a cacophony on a Saturday morning... Okay, maybe it's not that bad, but the question still has to be answered with something delicious. Now I have to confess that this was not something Grandma made. It's something I thought I would "sneak" in here that you would enjoy because we sure do. 

Years ago, I found this easy fixer in Country Home magazine and recently resurrected it from my personal recipe collection. This is so easy to prepare. Plus a small batch can help you can get rid of those last few pieces of the sandwich loaf (and then use the crusts for your chickens, if you have them, or save for breadcrumbs), use up leftover bacon, and use up a few eggs that we seem to have plenty of most of the time (thanks to those aforementioned chickens!). 

These are fantastic for brunches too. Just be sure to make up the Potato Gratin Francais to go along with it. You'll be the most popular person on the block...for a couple minutes anyway.


Breakfast Cups

6 slices sandwich bread, crusts removed
3 eggs
1/4 cup heavy cream
1/4 tsp salt
1/4 tsp pepper
3-4 slices of cooked bacon, diced
6 slices of sharp cheddar cheese (or your preference)

Preheat oven to 350F.

Thoroughly grease a muffin tin with butter or canola oil spray.  Gently press bread slices into muffin cup to make a cup. Put a few pieces of bacon in bottom. Set aside.

Mix eggs, cream, salt, and pepper. Carefully pour into each cup containing the bread to just below the top (egg will rise). Top with cheese trimmed to fit over top. Put a couple pieces of bacon on top of each cup.

Bake 1/2 hour or until eggs are thoroughly cooked (test with wooden toothpick). Servings: 1-2. Multiply by number you wish to serve for adequate portions.
Related Posts Plugin for WordPress, Blogger...