Thursday, December 16, 2010

Slow-Cooked Chicken

This recipe reminds me of summer.  Probably because it was customarily prepared by Grandma when we had relatives visiting during the summer. Our family had a lot of birthdays in July and August (Grandma's was on July 15) and Grandma knew we enjoyed this dish, so she would make it in the crockpot (although you can prepare it in a couple hours on the stovetop in a Dutch Oven, if you prefer).  So why would Grandma want to cook to celebrate her own birthday you ask? Because that's how she "rolled" (as my kids say). To translate, I think that means: That's how she "operated." Her entire focus was on everybody else and it was part of her nature to do something special even if it meant a little work on her part. 

Another amazing thing about Grandma is she never suffered a "martyr complex" or anything like that. It simply wasn't there. All you ever sensed in her kitchen was joy in preparing something, anything for her family. She was such a great lady.

This recipe is so versatile because when it's all done, the chicken is very moist and tender for shredding, but you can keep the breast whole if you prefer. Grandma sometimes would put a whole piece on a hamburger bun with a slice of pineapple and Swiss cheese. Oh my. Shred it if you like though. It's amazingly good that way too and you can add as much or as little of the sauce as you like. 

Why only have this only at certain times of the year? You can have it year round. I give you permission! *wink*


Slow-Cooked Chicken

3 Tbsp butter
4 large boneless, skinless, chicken breasts
½ chopped onion
3 cloves garlic, minced
3/4 cup BBQ sauce
½ cup ketchup
1 Tbsp cider vinegar
1 Tbsp soy sauce
1 Tbsp Worcestershire sauce
½ tsp hot pepper flakes (optional)
1½ Tbsp brown sugar

Heat butter in Dutch Oven or skillet. Brown chicken on both sides.

While chicken is browning, mix together BBQ sauce, ketchup, cider vinegar, soy sauce, Worcestershire sauce, pepper flakes (if using), and brown sugar. 

After chicken is browned, remove and set aside, add additional butter if necessary and sauté onions for 3 minutes. Add garlic and continuing to sauté for an additional 2 minutes.  Pour in liquid mixture and scrape up any brown bits on the bottom of the pot.   

 Put chicken back in and cook on low for about 1-2 hours. (You could use a crockpot for this and cook on low for 6 hours.)  When done, remove the chicken and shred by pulling apart the meat with two forks.  Add some of the juice left in the pot until well coated.  Serve piled on toasted onions buns. Serves 4-6.

Wednesday, December 15, 2010

Swedish Meatballs & Gravy

What is heartier for your hungry brood than Swedish meatballs with gravy, potatoes (of any variety), and a steamed fresh vegetable? Nothing. At least for tonight's dinner.

Grandma had a lot of Scandinavian friends and they all had a different recipe for this comfort food.  Some used a mixture of pork, beef, and veal. Some used only beef. But the best one came from Grandma's friend and neighbor Jennie--remember that amazing Carrot Cake from a few weeks back? Yes, that one. Need I say more?

Try these and remember as you're going through the process of lovingly preparing all these recipes from Grandma's collection that the extra steps--and, perhaps, extra trouble--to make these from scratch, your family will remember sitting at the table and enjoying a delicious dinner together. It's part of that discussion about family companionship and sharing food. It equals love, comfort, and memories in the making!


Swedish Meatballs (Köttbullar)

2-3 Tbsp butter
½ lb ground beef
½ lb ground pork
½ cup bread crumbs
1 ½ cups whole milk
1 egg
3 Tbsp onion, chopped
1 Tbsp butter
1 ½ tsp salt
¼ tsp pepper

Gravy:
1 Tbsp flour
¾-1 cup cream or milk
Salt and pepper to taste

Melt butter in skillet and sauté onions until golden brown. Soak bread crumbs in milk. Add meat, egg, onion, salt and pepper and mix thoroughly until smooth. Shape into balls. Fry in butter until browned evenly. Remove each batch to saucepan and clear skillet with a little water, before starting next batch, saving pan juices each time. 

When all meatballs are fried, mix flour and cream add to pan juices, stirring constantly, and simmer 10 minutes. Add more milk or cream if too thick and season to taste. Place meatballs in deep serving dish and pour gravy over. 

These freeze beautifully! Make the meatballs and put in freezer bag to freeze until you're ready to cook them!

Tuesday, December 14, 2010

Braised Beef Roast

Just like any other popular food dish, there are a million and one recipes for pot roast, braised beef, whatever you want to call it. The secret weapon Grandma  used for a no-fail, moist roast? Searing the meat before you cook it. In other words, heat up oil in a pan and put your seasoned beef in to sizzle for a few minutes on both sides.  It makes a nice golden crust on the meat and that is what holds in the moisture whether you cook it on your stove top or in the crockpot. 

You know, it floors me when a recipe calls for a beautiful roast and then tells you to put it in the crockpot and cook on low for 8 hours with some creamed soup. That's great if you want to make Shoe Leather Stew. The meat will almost always be dry and tasteless. Even a good crockpot recipe will tell you to sear the meat before the lengthy cooking process begins! Matter of fact, you could throw this roast in the crockpot after searing the meat (adding in the other ingredients when prepared) and it will be heavenly! Pair it with some of Grandma's smashed taters and a green salad, and you've got a meal that will make you and your family moan (in a good way!).

For that extra liquid that you reserve, here's how to transform it into a wonderful gravy: Make a roux (or flour/water mixture) to thicken it by using one of those handy-dandy tall shaker cups. Put about 1/4 cup water and a couple tablespoons of flour and give it a few shakes to make it smooth. Heat up the reserved liquid to boiling and slowly pour in the roux. Whisk until it thickens then reduce the heat to keep it simmering until you serve it. Enjoy!


Braised Beef Roast

1 chuck roast (3 lbs)
2 tsp salt
1 tsp pepper
1 tsp garlic powder
 olive oil
 
1 onion, diced
2 garlic cloves, minced
½ cup beef broth
1 can Cream of Mushroom soup (or 1 cup Grandma’s Basic Cream Soup--Mushroom)
½ cup white wine (optional)

In Dutch Oven or skillet, heat 2-3 tablespoons of olive oil over medium high heat. Meanwhile, thoroughly coat roast with seasonings and place in hot oil to sear both sides until brown. Remove from pan. 

Heat additional tablespoon olive oil, then reduce heat and cook onion until translucent. Add garlic and cook for about a minute. Add ½ cup beef broth, scraping up any brown bits that remain. Add in cream of mushroom soup and white wine (if using), stir to combine and cook until bubbling. Pour liquid in separate container temporarily and put browned meat back in.  Pour half of reserved liquid over meat, cover, and simmer on low heat for about an hour until meat is tender. Extra liquid may be made into gravy. When serving, pour over smashed potatoes and meat.

Monday, December 13, 2010

Chicken Broccoli Casserole

I've lost count how many times I've said that Grandma loved real food. This didn't include a lot of the convenience foods we've gotten in the habit of paying a premium for. This also didn't include include some of the convenience recipes that makes you feel like you're cooking. You are really not cooking when you throw some diced rubber chicken and frozen broccoli in a casserole dish, slop some cream of mushroom soup over it and call it a day. That is not chicken broccoli casserole. Not really.

This casserole is from scratch and there is a little more to it than the throwing and slopping of the convenience recipe, but I challenge you to really enjoy the process. Don't prepare it when you're in a hurry. Take your time and savor all the wonderful ingredients that go into it. Smell that richly fragrant tarragon! When it's all prepared, set it before your family and watch it disappear. Even the broccoli haters will love it.

Grandma didn't make this a lot in the early days simply because chicken was somewhat pricey. But later on when it became more readily available she served it with a simple tossed salad. No need for anything else, because it's all in there!


Chicken Broccoli Casserole

2 tbsp softened butter
4-5 boneless chicken breasts
1/3 cup dry white wine
1 1/2 cup organic chicken broth
1 tsp dried tarragon
1 onion, chopped
1 garlic clove, minced
Salt and pepper to taste
4 cups rigatoni (or any other short pasta)
2 cups broccoli florets
2 tbsp all-purpose flour
1/2 lb Havarti cheese, shredded
3/4 cup breadcrumbs (process 2 slices of French bread in food processor)

Melt half the butter in a large pot over medium heat, add chicken and brown on both sides.  Pour in wine and chicken broth, add tarragon, onion, garlic, salt and pepper.  Bring to a boil over high heat. Cover and let simmer over low heat for about 20 to 25 minutes, until chicken is tender. 

Meanwhile, cook the pasta according to package instructions; drain and set aside. Cook the broccoli until almost done (it will cook the rest of the way in the casserole), then drain, if necessary and set aside. 

Remove the chicken from the pot and cut into chunks. Keep warm. 

Stir the other tablespoon of butter into the liquid left in the pot until melted, then add the flour and stir mixture, scraping up any brown bits that may remain. Bring to a boil over medium heat, stirring constantly. Remove from heat, gently stir in pasta, broccoli and chicken chunks. Pour in ovenproof casserole, top with shredded Havarti cheese and breadcrumbs. Bake in the oven at 350 for 8 to 10 minutes, until golden brown. Serve hot. Heavenly!


Sunday, December 12, 2010

Grandma's Meatloaf

This meatloaf is hands-down-knock-yer-socks-off delicious, moist, filling, and everything an awesome meatloaf is supposed to be--not only on the day you serve it, but for a sandwich or two the next day--if it lasts that long!  

It has to be the bacon on top. Or maybe it's the tomato paste. Whatever it is, you've got to try it and this will become your go-to recipe for meatloaf.

Because Grandma had no less than 50 meatloaf recipes in her cookbook, it was difficult to decide which one to use. All the recipes were variations on a theme really, but this was the one that appeared to be used the most--what with the tell-tale drips and smudges all over it! As soon as we tried it, we knew this was The One!


Grandma's Meatloaf

1½  pounds ground beef (chuck is best)
½ pound ground pork sausage (whatever variety you like)
2 eggs, lightly beaten
1 cup fine bread crumbs
2 large cloves of garlic, minced
½ cup diced sweet onion
¼ cup diced green bell pepper (optional)
1 tsp oregano
Freshly ground pepper to taste
1 Tbsp Worcestershire Sauce
5 Tbsp Grandma's dry onion soup mix (see below)
    or 1 packet dry onion soup
½ cup milk
1 (8-ounce) can tomato paste, divided use
2 to 4 strips bacon, cut in half (optional)

Preheat oven to 350F.  Combine ground beef, pork sausage, eggs, bread crumbs, garlic, onion, bell pepper, oregano, ground pepper, Worcestershire Sauce, dry onion soup mix, milk, half of the tomato paste. Gently mix only until combined so meatloaf isn't tough. Form into loaf and spread tomato paste on top.  Weave bacon strips over the top. Bake 1 hour and 15 minutes. Test for doneness, then let meatloaf rest for 15 minutes before serving. Yield: 8 servings.


Grandma's Dry Onion Soup Mix

3/4 cup minced dehydrated onion flakes
1/3 cup beef flavored instant bouillon powder
4 tsp onion powder
1/4 tsp celery salt
1/4 tsp sugar
1/8 tsp pepper

Mix together and store in container with tight fitting lid or plastic bag.  [5 Tbsp equals 1 packet of purchased mix.]

Saturday, December 11, 2010

Holiday Spritz Cookies

During the Christmas season there's no cookie more famous than the Spritz. 

At about 4 or 5 years old, I remember sharing the Spritz "adventure" with Grandma. She would make up a batch, grab a handful out of the mixing bowl, put it in the cookie press, and hand it to me! She even taught me how to change out the little plates so we could make all kinds of beautiful (or so I thought) holiday shapes--trees, candy canes, little flowers and snowflakes, long wavy stripe-like things, and a ton of others. I probably ate more of the dough than what I was supposed to--and Grandma knew it too--but she never said a word. This was a celebration of butter, sugar, and loving companionship!

But the fun didn't end there. After the cookies came out of the oven and were still a little warm, we would shake sprinkles over them and add on some of the little silver balls--dragées, I think they're called (never would have known that without Martha!). This was one of my most vivid Christmas memories and it wasn't limited to my preschool years. We continued making these every Christmas until I had children of my own and then we inducted them into the family "Spritz-pressing club."

Isn't is amazing that food can provide such meaningful memories? I think there's a lesson to be learned here about what's really important not only at Christmas but all year long. It's not about money or the stuff money can buy, but connecting and taking the time to just BE with one another doing something simple--no pressure and no expectations! In this case, it's just a 1/2 pound of butter, some sugar, flour, a cookie press, your loved one and your time!


Spritz Cookies

 1½ cup butter
1 cup sugar
1 egg (room temperature)
2 Tbsp milk
1 tsp vanilla
½ tsp almond extract
4 cups all-purpose flour
1 tsp baking powder

Preheat oven to 400F. 

Thoroughly cream butter and sugar. Add egg, milk, vanilla, and almond extract; beat well.  Stir together flour and baking powder. Gradually add to cream mixture, mixing to make a smooth dough.  Do not chill. Place dough into cookie press and press cookies onto ungreased cookie sheet. Bake at 400F 6-8 minutes. Remove cookies from sheet and cool on rack. Makes about 6 dozen.


Friday, December 10, 2010

Grandma's Toffee Bars

It was easy to tell when Grandma's Toffee Bars were in the works. The tell-tale inventory of huge Hershey's Chocolate Bars, the baking dish on the counter, the chopped pecans...we just knew.

These are actually more like cookies, because the crust is softer and a little less dense than other toffee bar recipes. In my humble opinion, these are the best toffee bars out there. They don't take long to prepare and waiting for them to cool is what takes the most time. It's hard to cut them into squares when they first come out of the oven because the knife "pulls" through and you can't get a clean cut. So waiting is best.

Great Grandma Kate c. 1968
There's a picture of my Great Grandma Kate (Grandma's mother) sitting at the kitchen table. In the middle of the table was a little snowman and a plate of these cookies. That was probably Christmas about 40 years ago, so these cookies go back a long way and of all the cookie recipes in Grandma's collection, these are our family's absolute favorite. (How many times do we say that?!) They are a little pricey to make because of the candy bars, but when they go on sale it's the perfect time to stock up!


Gram’s Toffee Bars

 Crust:
½ cup butter
1 cup packed brown sugar
1 egg (at room temp)
1 tsp vanilla
1 cup flour
1 tsp baking powder
½ tsp salt

Topping:
½ lb Hershey’s chocolate bar (2 large bars)
½ c chopped walnuts or pecans (optional)

Combine butter and sugar and beat until creamy.  Add egg and vanilla and blend thoroughly.  Stir in dry ingredients and mix until dough is stiff.  Press into  9x13 greased baking dish and bake in 350F oven 30 minutes.  Evenly distribute pieces of chocolate bar on top of crust and melt. Spread out chocolate and top with chopped nuts. Wait until almost cooled before cutting. 

Thursday, December 9, 2010

Lemon Bars

Grandma got this recipe from a friend in her Garden Club. Every month they would have a meeting at someone's house to talk about gardening trends, plant care, and community service. All the ladies in that group were amazing cooks so when Grandma got a recipe for something delicious from one of them, she was as excited as a school girl to go home and try it out for herself! 

This was one of those winners--so easy to prepare and SO good any time of year. Who says Lemon Bars can't be made during the holidays? There's always someone who prefers something a little tart instead of rich and sweet! It keeps life interesting, doesn't it?


Lemon Bars

Crust
2 cups flour
1 cup butter or margarine
½ cup powdered sugar

Cream together ingredients for crust. And press into ungreased 9x13 inch baking dish. Bake for 20 minutes at 350F.

Filling
4 eggs
2 cups sugar
½ tsp salt
5 Tbsp lemon juice
4 Tbsp flour

Mix together and pour over crust. Bake 20 minutes at 350F.

Wednesday, December 8, 2010

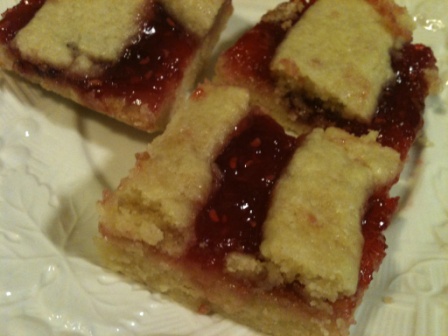
Raspberry Jam Cookies

Grandma was so good at tweaking recipes so the next batch would be even better than the one before.  Even though we thought everything she cooked was wonderful, she was a perfectionist! In pastry recipes, her butter would always be super cold (even spending 5-10 minutes in the freezer before starting), her eggs would be at room temperature so they mixed more smoothly, and she would never fuss with the dough. She would get the ingredients in there, combine with a pastry cutter or large fork, and never overwork it. "Just until crumbly," She would always say. This is one of those recipes that shouldn't be overworked, otherwise the dough would be tough and not light and flaky like it's meant to be.

Also keep in mind that the quality of the cookie is based on the quality of the jam you use. Smuckers is fine, but you'll get a premium cookie using Bonne Maman or--better yet--your own homemade preserves or jam. 

Be prepared to make a couple batches because these disappear faster than a dollar bill in D.C.!


Raspberry Jam Cookies

3 cups all-purpose flour
1 cup sugar
1 tsp baking powder
½ tsp salt
1 cup butter, chilled & cut in chunks
2 eggs
2 tsp vanilla
¾ cup raspberry jam or preserves (or other flavor of your choice)

In a bowl, combine flour, sugar, baking powder and salt then cut in butter with pastry blender until mixture is crumbly. Combine eggs and vanilla, then stir into crumb mixture until blended. Remove half of the dough, pat into a ball, and chill in the refrigerator for about 1 hour. Press other half of dough in an ungreased 9x13 baking dish to make a crust, then spread jam or preserves over it.

Take chilled dough out of refrigerator, roll out thin (about 1/8 inch), and cut 1 inch strips with pastry or pizza cutter and lattice the top of the cookies. Bake at 325F for 30-35 minutes or until golden brown. Cool and cut into bars. Enjoy!

Tuesday, December 7, 2010

Chocolate Oatmeal Crisps

Even though there are a million and one cookie recipes containing chocolate chips, pick any one and you couldn't possibly mess it up! This one contains rolled oats and nuts. We prefer no nuts in ours, but even without them the result is amazing!  Light, crunchy, and loaded with chocolatey goodness. What's more, they pack up beautifully in a gift bag or a box as long as you give them plenty of time to cool. They are a perfect addition to your holiday cookie repertoire!


Chocolate Oatmeal Crisps

¾ cup sifted flour
½ tsp salt
½ tsp baking soda
½ cup butter, softened
6 Tbsp brown sugar
6 Tbsp granulated sugar
1 egg, unbeaten
¼ tsp hot water
½ cup nuts (optional)
1 package coarsely rolled chilled semi sweet chocolate pieces
1 cup uncooked rolled oats
½ tsp vanilla

Sift flour, salt, soda. Thoroughly mix butter, sugar and egg until light and fluffy. At low speed beat in remaining ingredients.  Drop by teaspoonful on ungreased cookie pan. Bake in 375F oven for 10 minutes or until done.

Monday, December 6, 2010

Snowball Cookies (Russian Tea Cookies)

It's cookie week and what better time to share what Grandma used to share with her friends! 

Sharing was never something Grandma did only during the holidays. She would put together packages of goodies for friends throughout the year--just because.

The cookies we'll be sharing this week were Grandma's (and her friends') favorites and the ones we remember best. So make a few batches of one or more type of cookie, put a few in a cellophane bag, and tie with a pretty ribbon. Such a wonderful and unique gift and one that your friends will know came from the heart.

These Snowball Cookies (as we used to call them) were light, tasty with tea or coffee, and package beautifully for an edible gift. Grandma used to use walnuts in her recipe, but since nut allergies are so prevalent, perhaps another type of nut (or no nuts at all) would work just as well. With or without, these are delicious!


Snowball Cookies (Russian Tea Cookies)

1 cup butter, softened
½ cup powdered sugar
1 tsp vanilla
2¼ cup all-purpose flour
¾ cup finely chopped nuts
¼ tsp salt
Additional powdered sugar


Preheat oven to 400F. 

In a food processor or large bowl, mix butter, powdered sugar and vanilla. Stir in flour, nuts, and salt until dough holds together. Shape into 1-inch balls and place about an inch apart on an ungreased cookie sheet. Bake 10-12 minutes or until set but not brown.

Remove from cookie sheet and cool slightly, then roll warm cookies in powdered sugar. After cookies are thoroughly cooled, roll again in powdered sugar. Makes about 4 dozen.

Sunday, December 5, 2010

Tender Beef Stew

There is nothing more comforting than a hot bowl of beef stew on a cold winter day. It seems the entire house is filled with the fragrance and with a hearty loaf of bread, it's all comfort and joy!

Grandma was skilled at making a delicious stew and her secret was taking the time to brown the meat. This is critical even if throwing stew meat in the crock pot! Soaking in liquid and cooking on low all day does not guarantee tender meat. Sometimes it can actually turn out dry and tasteless. This is a wonderful recipe for stew on a weekend or you can prepare the meat for crock pot cooking the night before. Just remember to place the vegetables on top of the meat in the crock pot so they don't get soggy and overdone.

Another nice plus about this stew is its "freeze-ability." If you're fortunate enough to end up with leftovers that aren't spoken for, let them cool and pour into a freezer safe container for a great meal later on!

Don't forget to make (or purchase) a hearty loaf of artisan bread to go with this. Delicious!


Tender Beef Stew

2½ pounds beef stew meat or round steak, cut into cubes
Salt
Pepper
¼ cup flour
Olive oil
1 cup red wine (plus more if additional browning of meat is required)
1 medium onion chopped
1 (15 oz) can diced tomatoes
4 whole cloves garlic, peeled
4 carrots, cut into 1 inch chunks
4 potatoes, quartered
Mushrooms or other desired vegetables

Wash meat and pat dry, salt and pepper meat well, then dredge in flour. Heat oil in Dutch oven over medium high heat and add meat to brown thoroughly (about 5 minutes). This may have to be done in batches so all the meat has a browned crust; remove each batch after browning, then continue adding oil, heating it for each batch until all the meat is browned.

After all meat is browned and removed from the pot, pour in ½ cup red wine and deglaze the bottom of the pot by stirring with wooden spoon and scraping up brown bits. Pour liquid into container of browned stew meat.

Heat oil in pot and add in onion and garlic. Cook about 3 minutes until golden. Remove from pot then add in the other ½ cup of red wine and deglaze again. After deglazing, add in stew meat, onions, garlic, diced tomatoes, and additional liquid. Cover, bring to boil stirring occasionally. Reduce heat and simmer for about 1½ hours. Add in carrots, potatoes, mushrooms and any other desired vegetables, cover and cook about 40-50 minutes until vegetables are tender.

Saturday, December 4, 2010

Easy and Delicious Stovetop Chili

This recipe flies in the face of yesterday's post touting Grandma's lack of dependence upon the almighty prepared-item-in-the-can.  However, even Grandma used the canned varieties of tomatoes and beans without guilt. Sometimes she even opened up a can of corn or peas! As much as she would have loved to be the consummate farm girl that she was and go out to the garden and pick and prepare her veggies fresh, she lived in the city and urban farms had not quite taken off at that time. 

She didn't make this dish often, because Grandpa didn't care for foods that were too spicy, but when she did the wonderful smell was unmistakable. It can be made with or without the beef and still be amazing too.  This is also a great freezable item or a great dish to take to potlucks. Be sure to break out the cast iron skillet or muffin tin and make some cornbread to serve with it! Your family will sing your praises, I promise.


Easy and Delicious Stovetop Chili

1½ lbs natural lean ground beef (optional)
2 Tbsp butter
1 cup onion, chopped
1 cup bell pepper, chopped
1 cup celery, chopped
1 tsp garlic, minced
1 Tbsp Worcestershire sauce
1 Tbsp chili powder
1 (15 oz) can pinto beans (do not drain)
1 (15 oz) can small red beans (do not drain)
1 (15 oz) can pork and beans
2 (14.5 oz) cans petite diced tomatoes (do not drain)
1 (15 oz) can tomato sauce
2 Tbsp sugar
1 tsp salt
½ tsp pepper

Brown ground beef; pour off grease or liquid. Set aside. 

In Dutch oven or heavy pan, melt butter and saute onion until golden. Add bell pepper, celery, garlic, Worcestershire sauce and chili powder. Add in browned beef and combine. Stir in canned beans, pork and beans, tomatoes, and tomato sauce, stirring until combined. Add sugar, salt and pepper. Heat to boil, then reduce heat and simmer for 2 hours. 8 servings.
 
Serve with cornbread and salad for a filling and delicious meal!

NOTE: This freezes beautifully. Let cool after cooking and pour into your desired container.

Friday, December 3, 2010

Basic Homemade Cream Soup

One of the staples of the kitchen are cream soups. Grandma preferred to make her own, rather than depend on a can. After all a creamed soup is just a simple white sauce with milk, chicken broth and mushrooms or celery added, along with your good taste to flavor it. You can whip up a couple batches of it in about 15 minutes over the weekend and save it for your casseroles during the week. Delicious, cheaper, and much healthier than the "synthesized" version.

So here's Grandma's "secret" recipe.  Hello? You can wake up from your faint now! It IS that simple. Funny how we think things are more complicated than they are.


Basic Homemade Cream Soup

2 Tbsp butter
2 Tbsp flour
¼ tsp salt (optional)
1 cup whole milk or half & half (we use heavy cream)

Heat milk over medium low heat until just steaming. Do not boil.

In a heavy pan, melt butter, sprinkle flour in and whisk to combine, then continue cooking over medium low heat for 2 to 3 minutes whisking continuously. Slowly pour in heated milk and whisk until thickened. (Season to taste...you may have enough salt if using the broth.)

*For cream of chicken use ½ cup chicken broth and ½ cup milk. 

*For cream of mushroom, saute ¼ cup finely diced mushroom in the butter, then add flour and prepare as you would cream of chicken, using ½ cup chicken broth and ½ cup milk.

*For cream of celery, saute ¼ cup finely diced celery in the butter, then add flour and prepare as you would cream of chicken, using ½ cup chicken broth and ½ cup milk.

Thursday, December 2, 2010

Bacon Cheeseburger Pockets

Here's a simple recipe that's sure to be a hit with your kids (but, unfortunately, not part of a Weight Watchers diet).

There's something about bacon cheeseburgers, Velveeta cheese, and croissants that strikes a cord with  those "Monster" drinking teenagers. This one hits on all three and a variation of a recipe Grandma used to make from scratch long before Hamburger Helper was ever invented. Perhaps it was the thing that prompted those Hamburger Helper folks to create the stuff in the first place. However, this is much better because it's made from scratch--and we'll keep telling ourselves that.

If you have a few extra cents in the weekly family food budget and you are seeking positive cooking reinforcement from your family, this will be the one that wins you kudos. Grandma used to make it with noodles--I believe macaroni noodles--as a mock "Stroganoff" dish.  But in this variation you pocket the meat mixture in heavenly croissant dough and cook to golden perfection. 

Enjoy this and report back to me on the smiles from your kids and grandkids (and probably your significant other too)!


Bacon Cheeseburger Pockets

1 pound sliced bacon, diced
1 ½ - 2 pounds natural ground beef
2 Tbsp butter
1 small onion, chopped
½  tsp pepper
1/3 loaf of Velveeta cheese, sliced
2 tubes crescent roll dough


In a large skillet (or your favorite bacon cooker), cook bacon over medium heat until crisp then remove to paper towels to absorb any extra grease.

In Dutch oven or large skillet, cook beef and onion, adding pepper last. Add cooked/drained bacon and cheese and stir until melted (it will become somewhat soupy, but that's okay).

Open the tubes of crescent rolls, unroll dough, fuse together 2 triangles of dough so you have a rectangle, then cut in half. With slotted spoon, put 1/4 cup of the meat mixture in the center of each square, pinch corners and create a "pocket."

Place 2 inches apart on greased baking sheet and bake at 400F for 9-11 minutes or until lightly browned. Brush with butter and serve warm. Serves 4  plus you'll have meat mixture leftovers.

Pair with a tossed salad then pass out from the sheer deliciousness. 

If you have leftovers of the meat mixture, cook some elbow macaroni and mix it together for a tasty next-day lunch treat. This dish is totally versatile so you can cook dinner mixing it with the elbow macaroni and still have a "keeper" on your hands!

Wednesday, December 1, 2010

Layered Spaghetti Casserole

This Layered Spaghetti Casserole is good on so many levels! Here's why:

1. It's a great use for leftovers of spaghetti sauce (like Grandma's Famous Spaghetti Sauce).

2. It's great for meal planning at least once a month, which is so important for working parents trying to live within their means but still provide meaningful meals.

3. It can be cooked with or without meat...aka cheaper and healthier.

4. It can be prepared in advance and frozen.

5. It's so easy Grandpa could put it together and feel mighty proud of himself. 

6. It's absolutely delicious and even your picky eaters will love it.


It's all about meal strategy, planning and coordination. Sounds very scientific, doesn't it? Really it's not rocket science. Just good common sense.

This casserole is delicious with a salad of greens and some great bread or rolls or better yet, how about those Parmesan Breadsticks?


Layered Spaghetti Casserole

1 Tbsp olive oil
1 lb natural, lean ground beef, optional
2 cups good spaghetti sauce (like Grandma's)
1 onion, chopped
1 clove garlic, minced

1 small can mushrooms
Italian seasoning
Parsley
¾ pound Spaghetti noodles
1 cup grated Parmesan cheese


Preheat oven to 375F.  Begin heating the water to cook spaghetti.

Grease a deep baking dish and sprinkle 1/3 cup of the Parmesan cheese on the bottom. 

Meanwhile, cook onion in olive oil until translucent then add in minced garlic and mushrooms.  Add in ground beef, if desired, and cook until no longer pink, then drain off any grease. Stir in sauce and simmer.   Add spaghetti noodles to boiling water and cook until almost done (don't over boil because the spaghetti will cook further in the oven). Drain off all water then begin layering as follows:

½ of spaghetti noodles on top of Parmesan cheese already in casserole dish.
½ of the sauce mixture over the spaghetti noodles (don't mix in)
Sprinkle on Italian seasoning and parsley
1/3 cup of Parmesan cheese
 

Other ½ of spaghetti  noodles
Other ½ of sauce mixture
Sprinkle more Italian seasoning and parsley

Sprinkle remaining Parmesan cheese on the top and cook 25 minutes in 375F oven or until cheese on top is melted.
Related Posts Plugin for WordPress, Blogger...